
How To Use WordPress
Learn how to use WordPress, the world's most popular content management system. From navigating the dashboard, to uploading a post, you'll learn it all.
What Is WordPress?
WordPress is a free content management system (CMS) that you can use to build dynamic websites and blogs.
The platform is designed to let you customize and manage your website using a user-friendly interface that is similar to what you are familiar with on popular platforms like Microsoft Word, Facebook, or Slack.
You don’t need any technical expertise to set up a WordPress website, but you may learn WordPress coding languages if you plan to create custom templates or add unique features to your website.
Anyone can learn how to use WordPress, and you don’t need to pay for some overpriced WordPress tutorial to work with the platform.
Learning How to Use WordPress
If you’re new to digital marketing, it can be very stressful to learn the ins and outs of building a website. But once you add learning how to use WordPress into the mix, things can get downright overwhelming.
Trust me, I’ve been there before, and I understand the feeling. That’s why I created a simple yet comprehensive guide to using WordPress.
I’ll walk you through the basics of using the world’s most popular content management system, step-by-step. I’ll teach you how to use WordPress, including core concepts like:
- Choosing between WordPress.com and WordPress.org
- Setting up and configuring your WordPress site
- Navigating the WordPress dashboard
- Selecting and customizing a theme
- Creating and editing posts and pages
- Adding and managing multimedia (images, videos)
- Using plugins for extended functionality
- Managing comments and user interaction
- Basic SEO practices for WordPress
- Backing up and updating your WordPress site
Once you understand the basics, things get a lot easier. By the end of this guide, you’ll have the knowledge and confidence necessary to begin work on your WordPress site.
So what’re you waiting for? Start the course and learn the basics today.
What Are the Basics of WordPress?
WordPress is a robust content management system, and you must familiarize yourself with its basic features to know how to harness the full potential of the platform.
Below, we will explore the essential components of the WordPress platform.
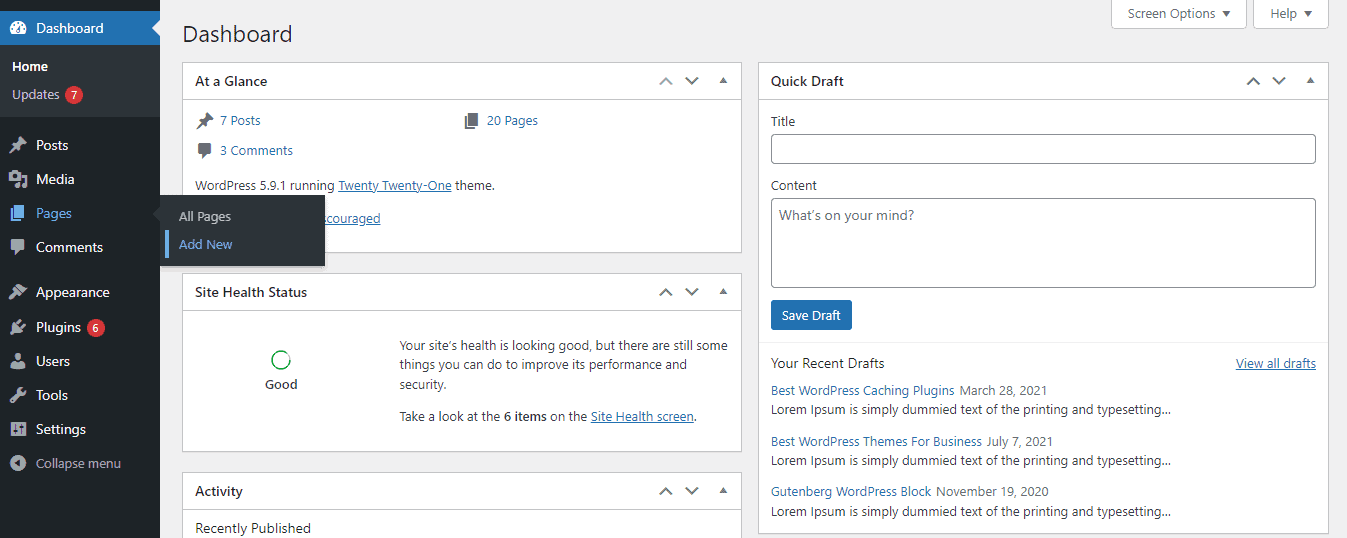
1. The WordPress Dashboard
This is the first screen you will see when you log in to the backend of your WordPress site.
It holds the sidebar menu that lets you access all the tools, plugins, settings, and content management features from one easily-navigable bar.
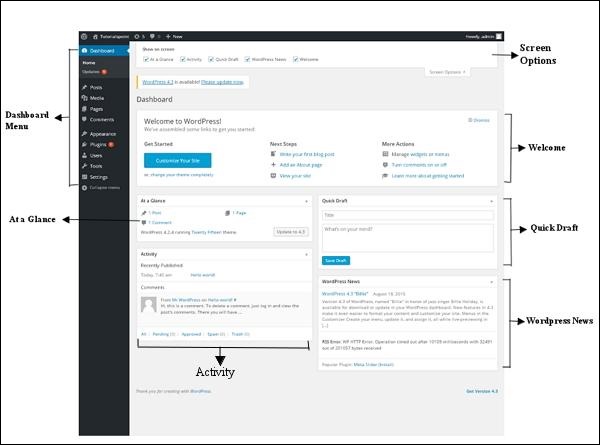
The right side of the dashboard screen holds a collection of widgets that display information on what’s happening on your WordPress website. You can also access the latest news from the official WordPress blog.
2. The Gutenberg Editor
Gutenberg is a block editor used to add text and multimedia content to WordPress pages and posts.
It is called a block editor because content elements like texts, images, videos, lists, tables, and more exist in the form of blocks.
You create content by dragging and dropping relevant content elements onto the blank space on your page or post.
It is different from the classic WordPress editor which is more text-based and has an interface similar to that of Microsoft Office tools.
The Gutenberg editor is built to help you add the full range of content types to your web pages in a more intuitive way.
3. Themes
WordPress themes are website packages with pre-built page-design templates and features that can be customized to get an appearance that suits your needs.
You can use a theme as it is or customize it to better express your brand identity.
The WordPress theme customizer lets you change colors and font styles, upload your logo, add elements to your header and footer, and more.
There are thousands of themes of free and paid themes in the WordPress themes directory.
You are sure to find the right WordPress theme for your website (whether it’s a blog, business website, portfolio website, multilingual website, online store, podcast website, online forum, or membership website).
4. Plugins
WordPress Plugins are tools that add extra functionality to your website. By installing a plugin, you are merging a new feature with the basic capabilities of the CMS.
Social media plugins that add social share buttons to your blogs are a good example.
Another excellent example is the WooCommerce plugin that transforms WordPress from a pure content publishing platform into an eCommerce store.
There are tens of thousands of WordPress plugins available to meet your every need.
WordPress comes with the Jetpack plugin pre-installed, and some hosting providers may also pre-install form, backup, and SEO plugins on your WordPress software.
Building Your Website With WordPress
Below is a step-by-step guide on how to set up a WordPress site with WordPress.org.
Following these steps will get you a website that will impress your customers and blog readers.
- Get a domain name and web hosting
- Install WordPress
- Fine-tune WordPress
- Choose and customize a WordPress theme
- Add content to your website
- Set up your home and blog pages
- Add plugins
Step 1: Get Domain Name and Web Hosting
A domain name is your identity on the web, it is how people will find your website on the internet.
Web hosting is the virtual home for your website on the web. It is the server space your web hosting company provides for storing your website files.
You can secure both your domain name and hosting space from your web host provider, and that’s why both tasks are grouped together.
To provide a practical explanation of this step, let’s assume you want to use Bluehost as your hosting provider.
Here is how to go about it:
Head to Bluehost’s home page and click the blue Get Started button.

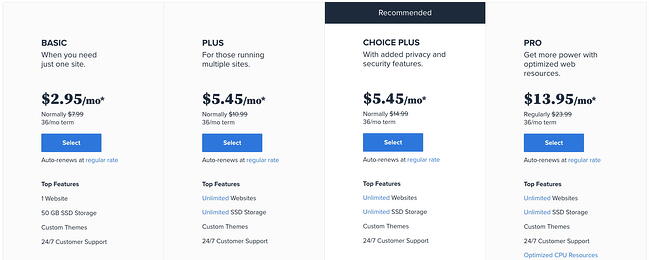
You will be taken to the pricing page where you will choose from four plans. After choosing the option that best fits your budget and technical requirements, click Select.
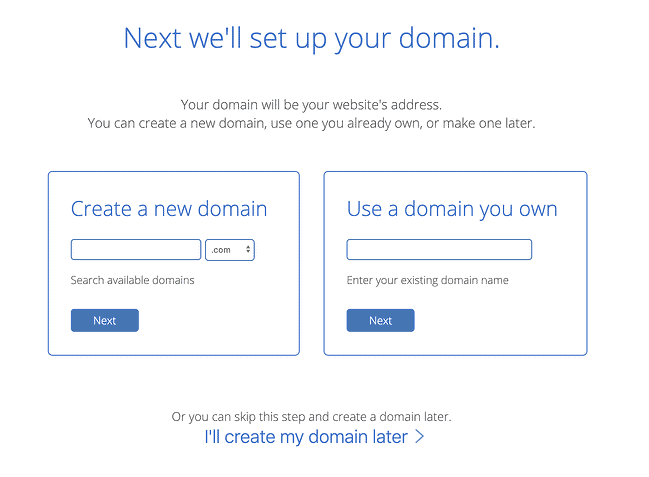
This will lead you to the page where you will input your desired domain name. Type the name you want into the form field and tap the blue Next button. You will be informed whether the name is available.
After you have registered a unique domain name, you will be brought to the final registration page where you will create an account for your WordPress hosting subscription.

A major advantage of using Bluehost is that WordPress will be installed automatically as soon as your account is confirmed.
You can then log in to WordPress directly from your Bluehost account.
Step 2: Install WordPress
If you are not using Bluehost or managed WordPress hosting services like Kinsta that will help you install WordPress automatically, you must connect your domain to your CMS yourself.
This time, let’s use Hostinger as our web host.
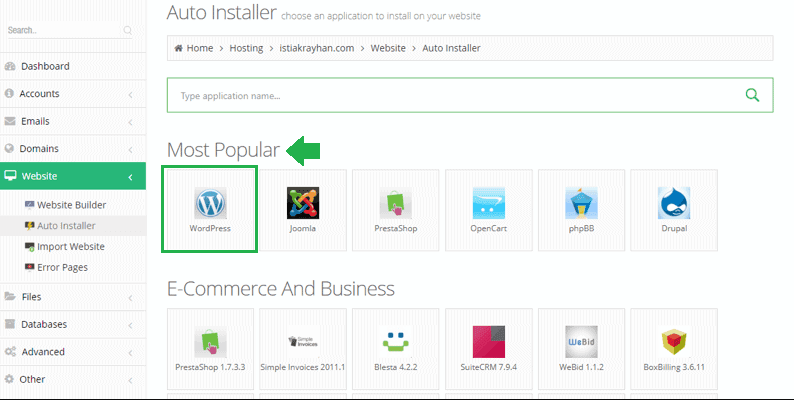
To start, log into your account, and scroll down the control panel until you get to the Website section. Then click on Auto Installer.
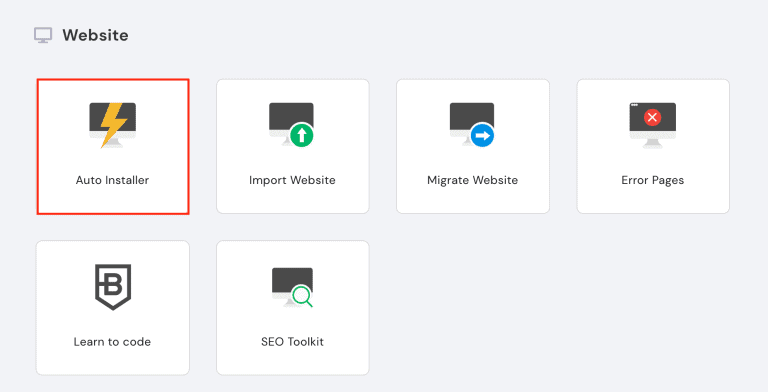
On the new page, go to the Most Popular section, find WordPress, and click on it.
You will be brought to a page where you will enter the URL of your domain and fill in the required fields. When you are done, click Install.
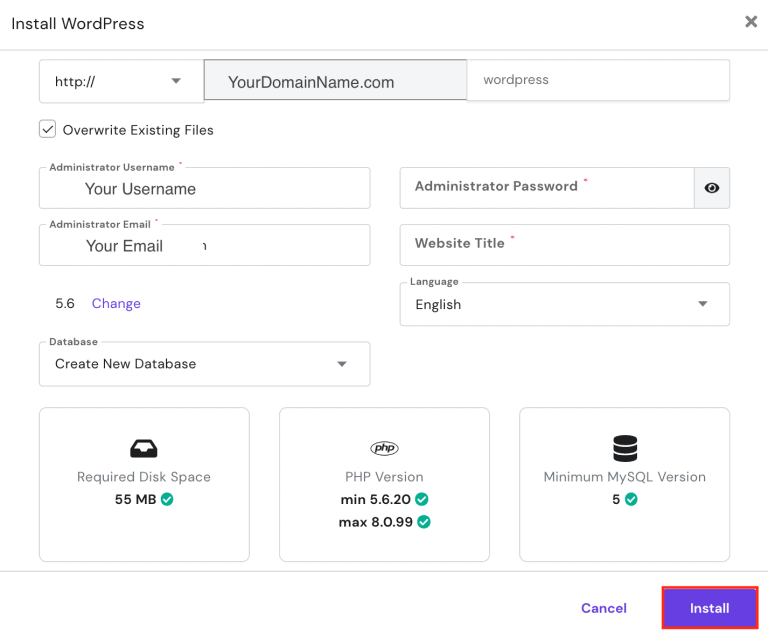
Once WordPress is installed successfully, you will get an email alert with your WordPress login link.
Click on the link and enter your login information to access your WordPress dashboard.
Another option is to use domainname.com/wp-admin/ to log in directly from your browser.
Step 3: Fine Tune WordPress
You must adjust a few WordPress settings before you start working on your site’s design.
Here are the things you need to do:
- Add your website title and tagline
- Select an SEO-friendly permalink structure
Let’s start with your site title. From the sidebar menu on your dashboard, select Settings > General
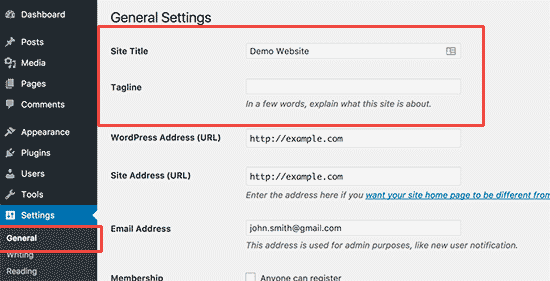
You will be taken to the page where you can add your website title and tagline.
You can also add an email for admin purposes, and your time zone.
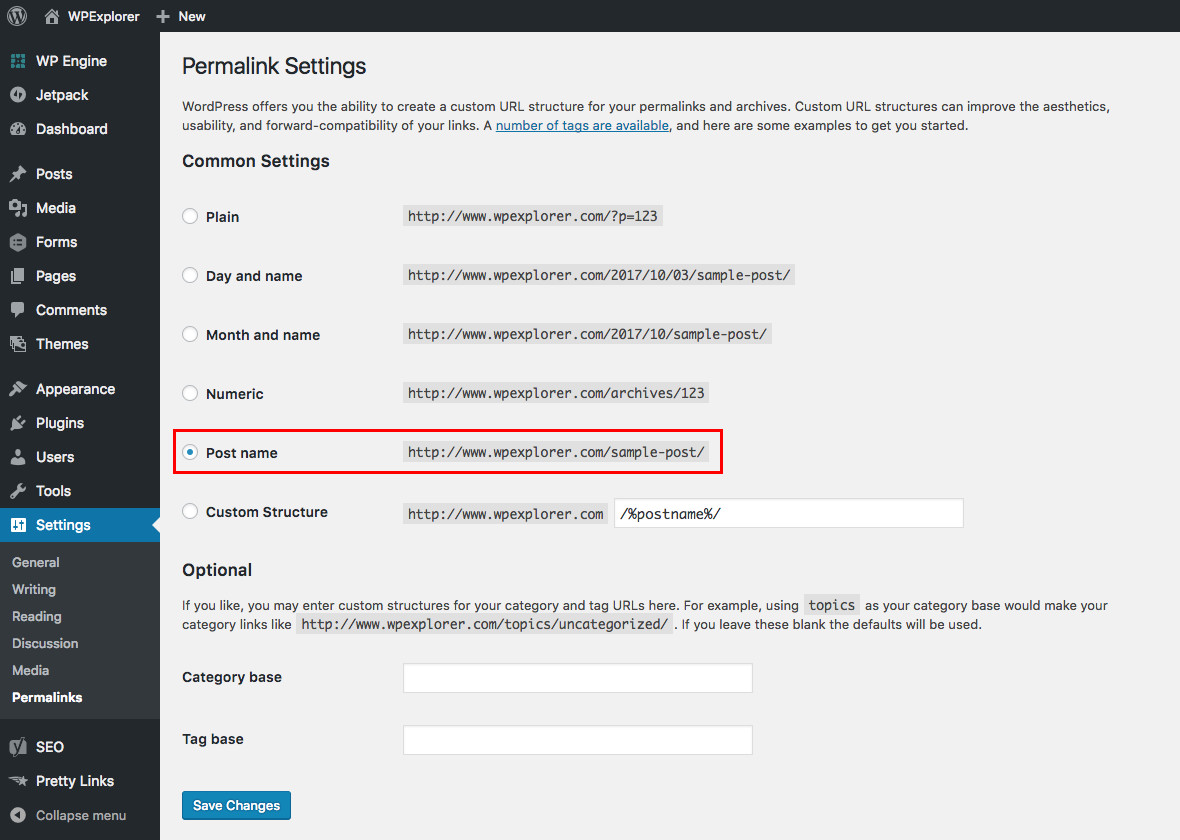
The next adjustment will take you to the permalinks page. Select Settings > Permalinks.
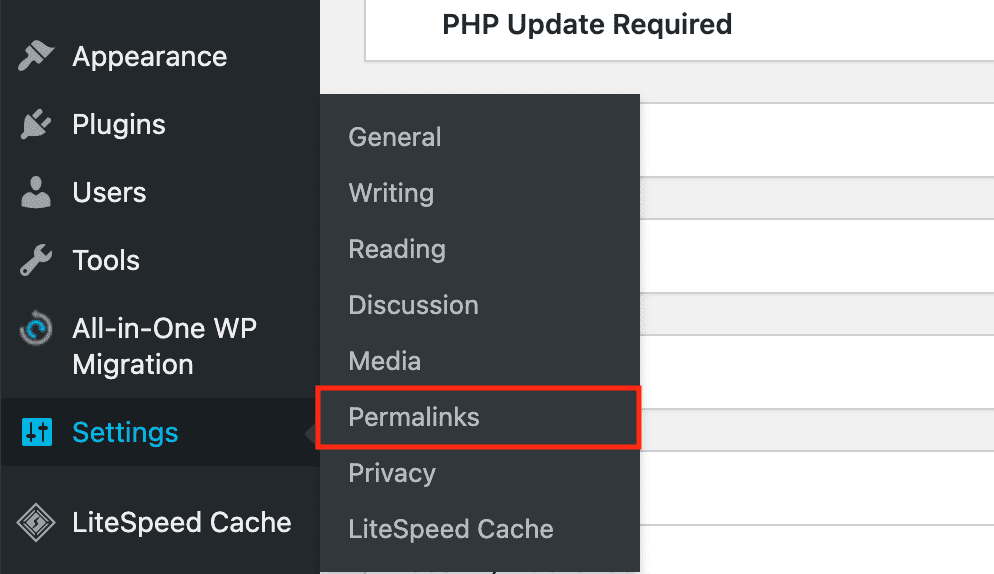
On the page, toggle Post Name to set it as your default website URL structure.
Then click Save Changes.
With that, all the preliminary adjustments are complete.
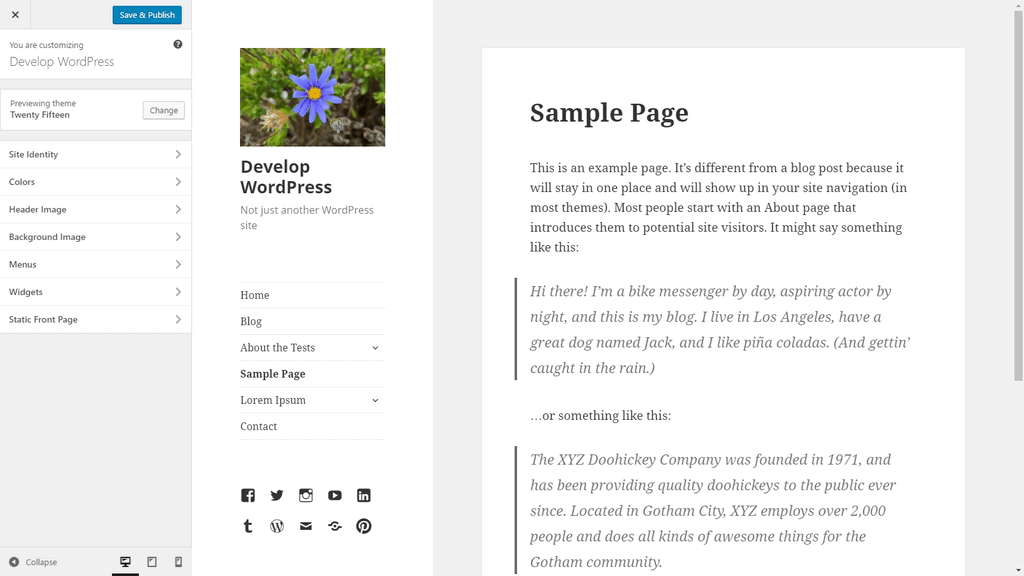
Step 4: Choose and Customize a WordPress Theme
To choose a theme, on the sidebar menu, select Appearance > Themes
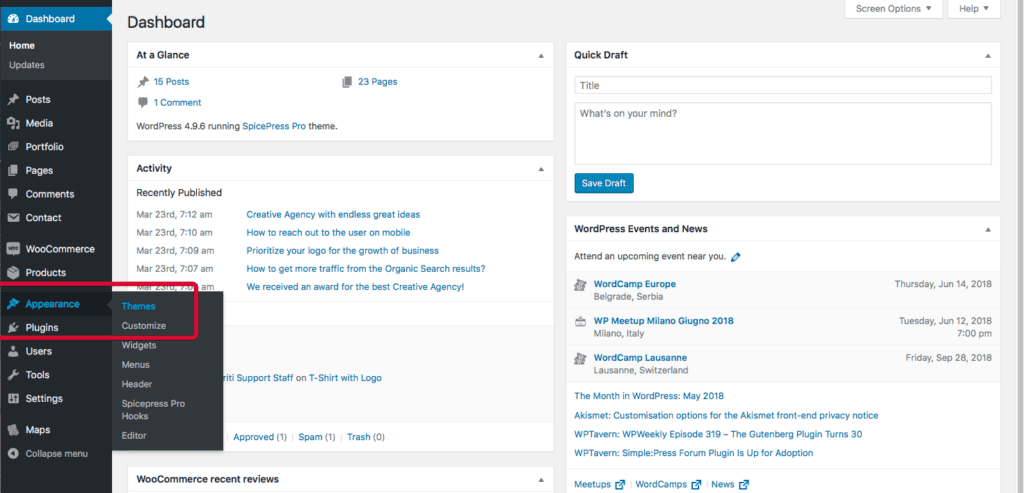
This will take you to the theme catalog.
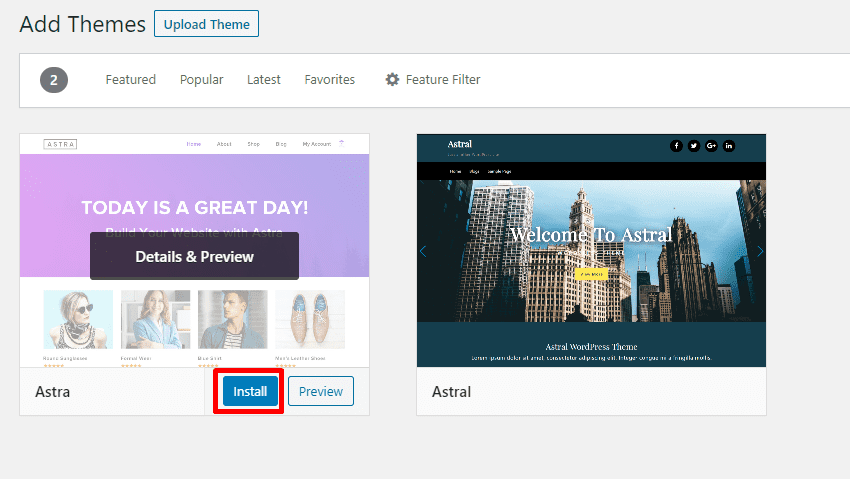
Type the keyword (for example: “food blog” ) for the type of website you are looking to create into the search bar to get relevant options.

You can also use the Feature Filter tool to sort the theme catalog by industry, site layout, and technical features.

Place your mouse over any theme that catches your interest and click More Info.
You will see a popup page with information on the theme.
You can also preview the theme to see what it may look like on your website.
Once you have made your choice, click on the blue Install button.
Installing the theme will launch the WordPress theme optimizer or a custom customizer from your theme developer.
You can then customize the design elements of your theme and adjust theme settings to fit your requirements.
Step 5: Add Content to Your Website
Pages and posts are the two mediums for adding content on WordPress.
Posts are for publishing blog posts, while Pages are used to create static webpages like your home page, contact page, about page, etc.
Start by creating your home page.
On the sidebar menu, click Pages > Add New
This will take you to the Gutenburg page editor screen.
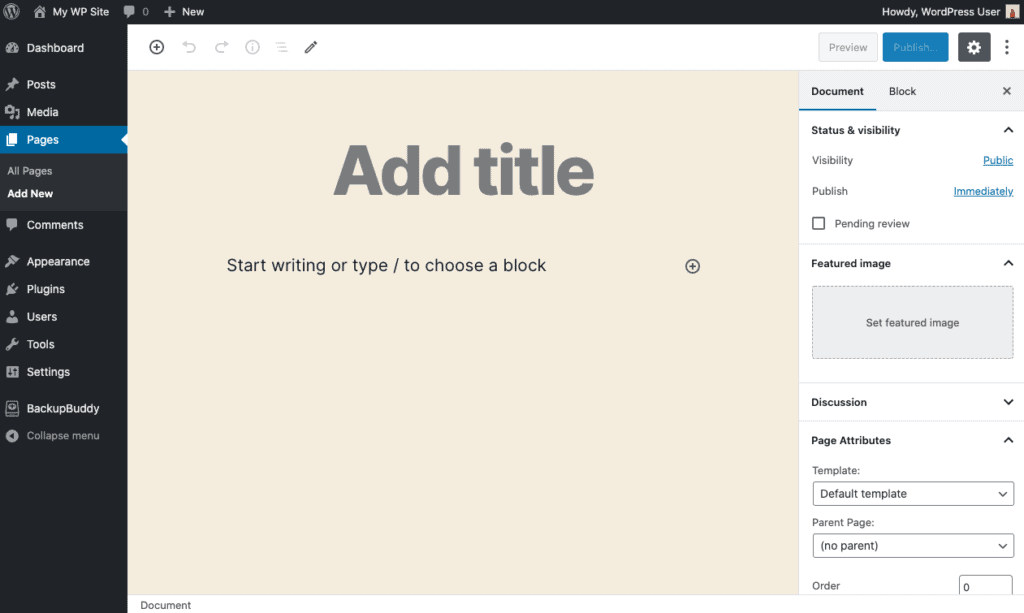
Here, you can add a title for your WordPress page and insert content blocks.
When you are done adding text and multimedia content to your page, click Save Draft to save your input or Publish to take it live.
Repeat the same process to add the other pages.
Adding a WordPress post follows a similar process. On the sidebar menu, click Posts > Add New
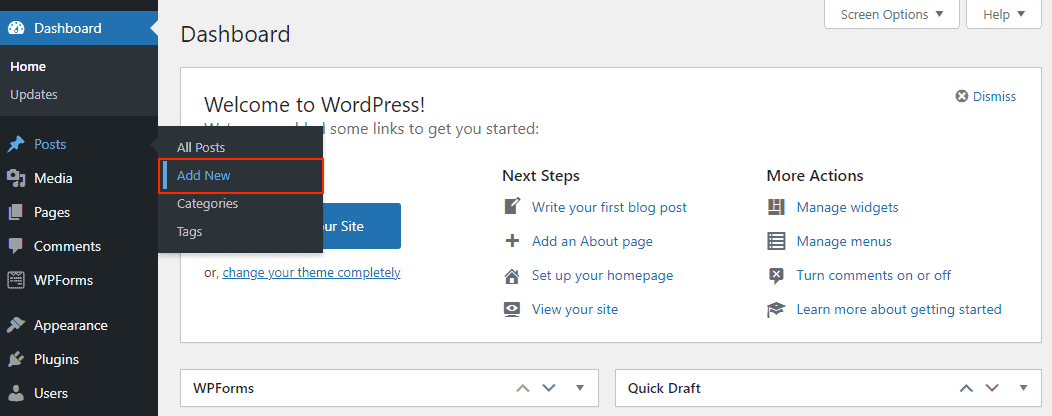
Write your WordPress post, save it as a draft or publish it immediately.
Step 6: Set Up Your Home and Blog Pages
On your new website, visitors will see a catalog of your blog posts on your front page.
This is not ideal, and the homepage should be a static page created for that purpose.
You will need to create a static page to serve as your homepage, and another to serve as your blog page.
Your home page will hold welcome information for visitors to your site, while your blog page will show your recent posts.
After creating the two pages, head to the sidebar menu and click Settings > Reading
On the Reading Settings page, go to the “Front Page Displays” section and toggle A Static Page.
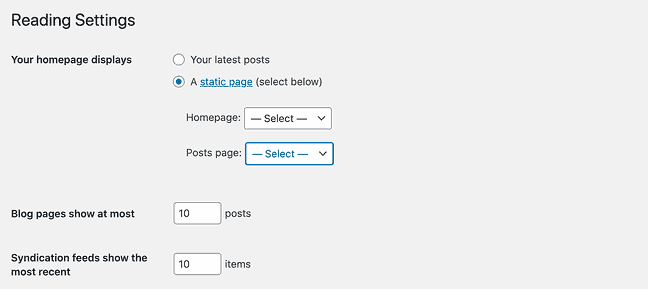
Then select your newly created home page from the Front Page dropdown menu and blog page from the Post Page dropdown menu.
Click Save Changes to implement your adjustments.
To confirm the new changes, select Pages > All Pages on the sidebar menu.
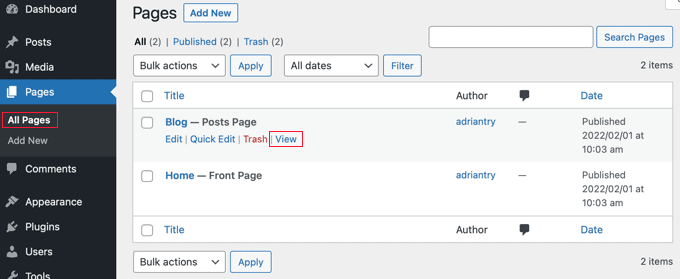
Click on the View link to both pages to preview them, and you should see the changes you implemented.
Step 7: Add Plugins
Before installing a WordPress plugin, check the Plugins page to see if you have any pre-installed extensions.
Head to the sidebar menu and select Plugins.
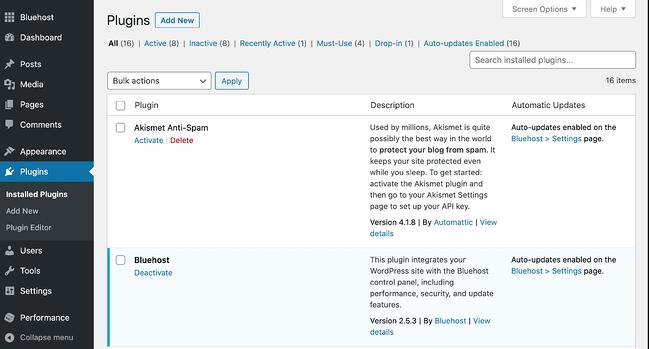
You may find only Jetpack on the page, or several other plugins depending on your hosting provider.
Click the Activate link for each plugin to implement its features.
Click the Add New button at the top of the page to access the official WordPress catalog of plugins.

Before installing any plugin, do your research on the best WordPress plugins for your specific needs.
Oversaturating your website with plugins will slow it down, and a slow website is bad for SEO.
Essential WordPress Plugins
The sheer number of plugins available can be overwhelming for a new user, and this list of essential WordPress plugins will ensure you only install the plugins you need.
- Jetpack — provides site security and performance enhancements
- Updraft Plus — backs up site data at preset intervals
- Sucuri — defends the website from malware
- Gravity forms — lets you create and publish forms
- WP Super Cache — uses caching to improve your site’s speed
- WP Smush — optimizes your images to make them load faster
- Yoast SEO — optimizes your content for search engines
What Are the Disadvantages of Using WordPress?

1. WordPress Relies on Third-Party Plugins for Additional Features
The thousands of plugins available on WordPress come from a wide variety of sources, and each developer builds their product with a different interface.
This creates a situation where you need to familiarize yourself with the interfaces and operational quirks of the many plugins on your website.
The different update cycles of each plugin can also create headaches for any WordPress user.
An update from one developer can create unwanted changes on your website, forcing you to take steps to revert your website back to its original state, and creating the risks of errors and broken links in the process.
2. Bloated Themes and Plugins Can Cause Slow Page Speeds
Page speed is one of Google’s most important ranking factors.
A slow-loading website will get demoted to the bottom of search results pretty quickly.
Many WordPress themes and plugins are bloated and written with low-quality code.
Installing these types of plugins on your site will make it load a lot slower.
Unfortunately, it is difficult to tell which plugin is developed according to the highest standards, and which is not.
To avoid making the wrong choices, start with our list of essential WordPress plugins, and other well-researched articles on the best SEO, caching, performance, and form-building plugins.
3. WordPress Sites Are a Big Target for Hackers
The maintenance of a WordPress website requires a degree of time investment that may be impossible for some site owners.
The plugins and themes on WordPress are updated periodically to counter new security threats, and lack of maintenance leaves you with outdated versions vulnerable to hackers.
Wrapping Up
WordPress is the most popular CMS on the planet, and you have now mastered how to use it to build your website.
Getting started won’t cost you much.
WordPress.com websites can be launched for free, while setting up a WordPress.org website can cost you less than $15 for your domain and web hosting.
With little to no barriers to getting started, you can get your WordPress website up and running today.
About Instructor

Course Includes
- 9 Lessons
- 5 Topics